
I agree Our site saves small pieces of text information (cookies) on your device in order to deliver better content and for statistical purposes. You can disable the usage of cookies by changing the settings of your browser. By browsing our website without changing the browser settings you grant us permission to store that information on your device.
In this post, we look at how to lay a mastic asphalt flat roof. We go into detail about the installation of an asphalt roof from start to finish. We cover everything from the preparation to the finishing with a coat of UV Solar Protective Paint.
When laying mastic asphalt to a flat roof the preparation is vital. The roof must be swept clean of all debris.
The skirting must be primed and all of the sheathing felt and required battens must be set out.
Once the lorry containing the mastic asphalt arrives on site with the mastic asphalt in blocks it is unloaded by hand and positioned close to the asphalt mixer. Next one of the roofing team will use a sledgehammer of a club to break up the blocks into smaller pieces. Normally these blocks of mastic asphalt are divided into quarters.
Now these quarters of mastic asphalt can be placed into the asphalt mixer. For health and safety, the gas which powers the mixer is placed a minimum of 3 metres away from the burners. For additional safety two fire extinguishers are placed in close proximity to the gas.
Once lit the mastic asphalt begins to melt. It forms into a large mass which has to be agitated. The objective here is not to burn the mastic asphalt but to allow it flow. Once the mastic asphalt has been fully agitated and has reached a temperature of 220° it is ready to lay upon the flat roof.
Now the temperature of the mastic asphalt must be controlled inside the mixer to ensure the consistency remains consistent. This is important to ensure the asphalt roof is laid perfectly.
The asphalt is transported to the roof in metal buckets but before this is done, the buckets are dusted with cement. This helps to make sure the asphalt flows out of the bucket in a consistent manner and does not stick to the sides of the bucket.
Once the bucket reaches roof level the contents of the bucket is poured in a 2-metre wide lap in the area which the mastic asphalt is to be laid.
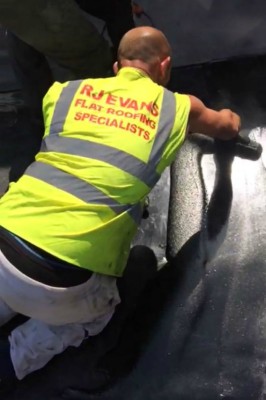
Next an asphalt specialists will use his float (interesting all of these floats are handmade) to lay the poured mastic asphalt evenly to a height of 10mm across the whole bay which he set out in the preparation stage with wooden battens.
Whilst this is going on the man who is on the member of the asphalt installation team who is operating the mixer will be breaking up the mastic asphalt blocks into quarters and re-filling the asphalt mixer. He will follow exactly the same process as before to get more asphalt ready to apply. This time for the top coat of mastic asphalt.
Now on the roof a new batten will be placed 100mm inside the initial coat. The same procedure is carried out on the top coat laying 10mm but this time coarse rubbing sand will be spread across the area where the mastic asphalt has been applied. This sand is rubbed with the laying float. The reason for this is to prevent any bitumen inside the asphalt coming up to the surface.
What would happen if this sand is not applied to the top layer? There would be a problem when it rains. The rainwater will lay in a large puddle and within a matter of week the bitumen in the asphalt will have been drawn to the surface. This will turn the asphalt a greyer colour and will create crazing. Crazing gives the appearance of continuous cracking across the asphalt. This is where the bitumen has pulled up through the asphalt and to the surface.
The problem of crazing can occur to all mastic asphalt surfaces including flooring, car parks, steps and balconies. The only time when no sand is needed in an asphalt application is when it is used for basement tanking.
Then to finish an asphalt roof it is always advisable to finish it with a layer of UV solar protective plaint. The reason for this the sun can cause the asphalt to heat which can cause a number of problems with are common for asphalt roofs. And can be greatly reduced by following some simple preventive steps, more information on this can be found here.
If you would like any information at all about asphalt roofing, whether it be maintenance, repair or installation please don’t hesitate to get in touch with us you can do this by calling us on 01277 375 511. One of our friendly team of asphalt experts will be delighted to assist you.
None None